在今天的指南中,我们将使用 Python、PostgreSQL、Docker 和CoinGecko API构建一个纸面交易机器人。Docker 允许我们将应用程序及其依赖项打包到轻量级、可移植的容器中,该容器几乎可以部署在任何机器和操作系统上。
什么是加密纸交易?
加密货币模拟交易是指无需投入真金白银的模拟交易,用于在无风险的环境中测试策略、练习交易并追踪业绩。通过追踪基于实时市场数据的假设盈亏,用户可以在投入实际资金之前建立信心。
模拟交易机器人是加密货币模拟交易的延伸——它们会自动为您执行交易,但它们并非在真实交易所下达真实订单,而是在本地进行模拟。这在根据当前市场状况尝试新策略时尤其有用。
先决条件
在开始之前,您需要以下工具:
-
Python 3.10+
-
IDE
-
Docker
-
Postgres
-
WSL 2(仅限 Windows)
Demo API 是免费使用的,并且足以满足我们的需求。创建您的 CoinGecko 帐户,前往开发者面板,然后点击“+添加新密钥”以生成您的 Demo API 密钥。请按照本指南获取有关生成和设置密钥的更多信息。
步骤 1. 设置 Python 环境
让我们首先创建一个干净的 Python 虚拟环境并安装所需的依赖项。在一个空目录中,运行以下命令:
| # Create venv | |
| python -m venv env | |
| # Activate env on macOS/Linux | |
| source env/bin/activate # For macOS/Linux | |
| # activate env on Windows | |
| env\scripts\activate |
| certifi==2024.8.30 | |
| charset-normalizer==3.4.0 | |
| greenlet==3.1.1 | |
| idna==3.10 | |
| psycopg2-binary==2.9.10 | |
| python-dotenv==1.0.1 | |
| requests==2.32.3 | |
| SQLAlchemy==2.0.36 | |
| typing-extensions==4.12.2 | |
| urllib3==2.2.3 |
pip install -r requirements.txt 从终端或命令提示符运行即可。
步骤 2.创建并导入您的配置
首先创建一个.env文件并定义以下变量:
| CG_API_KEY = "YOUR_CG_API_KEY" | |
| # for use outside docker | |
| DATABASE_URL= "postgresql://admin:admin@localhost:5432/data" | |
| # Application Settings | |
| TAKE_PROFIT = "20" | |
| STOP_LOSS = "10" | |
| ORDER_AMOUNT = "50" | |
| PRICE_CHANGE = "3" |
这些可以根据您的需求进行调整。这里需要注意的是PRICE_CHANGE变量。它表示代币在 1 小时内必须达到的最低价格变化百分比,以便我们的模拟交易机器人下达买入订单。这是我们逻辑的核心。
现在要将这些设置导入到我们的应用程序中,请继续创建一个名为utils的新目录,然后在该目录中创建一个名为 load_env.py的新文件。为了保持条理,我们将在此文件中加载配置变量,然后在每次需要访问它们时导入此文件:
| import os | |
| from dotenv import load_dotenv | |
| load_dotenv() | |
| cg_api_key = os.getenv("CG_API_KEY") | |
| db_url = os.getenv("DATABASE_URL") | |
| tp = float(os.getenv("TAKE_PROFIT")) | |
| sl = float(os.getenv("STOP_LOSS")) | |
| qty = float(os.getenv("ORDER_AMOUNT")) | |
| price_change = float(os.getenv("PRICE_CHANGE")) |
步骤3.创建项目结构
在构建我们的机器人之前,我们先来快速概述一下项目结构:

现在就可以自由创建这些,因为这个项目结构将作为构建我们的纸质交易机器人的基础。
步骤 4.创建模型
模型代表应用程序数据的结构 - 它定义实体(例如用户、交易或投资组合项目)的属性(字段)和关系,并充当相应数据库表的蓝图。
为了连接到数据库,我们使用 SQLAlchemy——一个强大而灵活的对象关系映射 (ORM) 库。SQLAlchemy 充当 Python 代码和数据库之间的桥梁,使我们能够将数据库记录作为 Python 对象来处理。
我们可以使用 Python 的内置类型系统来定义这些模型,并以更清晰、更易于维护的方式与数据库交互,而不必编写原始的 SQL 查询。
纸面交易机器人的主要功能是测试和衡量不同的策略及变体。为此,一个结构良好的数据库至关重要,因为它使我们能够高效地存储和查询与交易、市场状况和策略表现相关的大量数据。
在data_access/models下,我们继续创建一个名为base.py的文件。这样我们就可以为数据库模型定义一个通用的 Base 对象,并将其用于我们需要构建的各种表。
| from sqlalchemy.orm import declarative_base | |
| Base = declarative_base() |
创建硬币数据模型
现在我们可以开始定义模型了。在同一个目录中,创建一个名为coin.py的新文件。我们将在这里定义Coin模型:
| from sqlalchemy import Column, Float, ForeignKey, Integer, String, DateTime | |
| from sqlalchemy.orm import relationship, declarative_base | |
| from data_access.models.base import Base | |
| class Coin(Base): | |
| __tablename__ = "coins" | |
| id = Column(Integer, primary_key=True, autoincrement=True) | |
| coin_id = Column(String, unique=True, nullable=False) | |
| symbol = Column(String, unique=True, nullable=False) | |
| realized_pnl = Column(Float, nullable=True) | |
| prices = relationship( | |
| "CoinPrice", back_populates="coin", cascade="all, delete-orphan" | |
| ) | |
| class CoinPrice(Base): | |
| __tablename__ = "coins_prices" | |
| id = Column(Integer, primary_key=True, autoincrement=True) | |
| symbol = Column(String, ForeignKey("coins.symbol"), nullable=False) | |
| timestamp = Column(DateTime, nullable=False) | |
| value = Column(Float, nullable=False) | |
| coin = relationship("Coin", back_populates="prices") |
coins 表存储数据库 ID 以及coin_id ,后者是CoinGecko API使用的唯一标识符。 在获取特定代币的数据时,此 coin_id 至关重要。除了 coin_id 之外,我们还存储了代币的符号和achieved_pnl 值,该值将跟踪我们的机器人针对该特定代币所获得的总盈亏。
创建订单模型
在同一目录中,继续创建一个名为paper_order.py的文件,我们将在其中定义我们的 Order 对象。
| from typing import Literal | |
| from sqlalchemy import Column, Float, String, DateTime, Integer | |
| from sqlalchemy.ext.declarative import declarative_base | |
| from data_access.models.base import Base | |
| class PaperOrder(Base): | |
| __tablename__ = "paper_orders" | |
| id = Column(Integer, primary_key=True, autoincrement=True) | |
| timestamp = Column(DateTime, nullable=False) | |
| buy_price = Column(Float, nullable=False) | |
| quantity = Column(Float, nullable=False) | |
| symbol = Column(String, nullable=False) | |
| direction = Column(String, nullable=False) | |
| direction: Literal[ | |
| "BUY", "SELL" | |
| ] # Type hinting for Python-side checking, not affecting DB schema |
创建投资组合模型
我们最终创建的模型定义了 Portfolio 对象及其相关字段。在同一个data_access/models目录中,创建一个名为portfolio_item.py的新文件。
在此文件中,我们将定义两个对象:PnLEntry和PortfolioItem。
| from sqlalchemy import Column, Float, String, DateTime, Integer, ForeignKey | |
| from sqlalchemy.orm import relationship | |
| from sqlalchemy.ext.declarative import declarative_base | |
| from data_access.models.base import Base | |
| class PnLEntry(Base): | |
| __tablename__ = "pnl_entries" | |
| id = Column(Integer, primary_key=True, autoincrement=True) | |
| date = Column(DateTime, nullable=False) | |
| value = Column(Float, nullable=False) | |
| portfolio_item_id = Column( | |
| Integer, ForeignKey("portfolio_items.id"), nullable=False | |
| ) | |
| class PortfolioItem(Base): | |
| __tablename__ = "portfolio_items" | |
| id = Column(Integer, primary_key=True, autoincrement=True) | |
| cost_basis = Column(Float, nullable=False) | |
| total_quantity = Column(Float, nullable=False) | |
| symbol = Column(String, nullable=False) | |
| # Relationship with PnLEntry (One-to-Many: One PortfolioItem can have many PnLEntries) | |
| pnl_entries = relationship( | |
| "PnLEntry", backref="portfolio_item", cascade="all, delete" | |
| ) |
这使我们能够轻松地跟踪一段时间内的性能,并收集有关机器人在不同市场条件下的表现的宝贵见解。
步骤5.创建Docker环境
现在我们已经定义了模型,是时候设置我们的 Docker 环境了。
此步骤涉及两个主要组件:创建Dockerfile和docker-compose.yml文件 - 让我们更详细地介绍一下。
创建 Dockerfile
Dockerfile 定义了构建 Docker 镜像的指令。它指定基础镜像、安装依赖项、复制应用程序代码并设置环境。它是创建应用程序容器化版本的蓝图。
下面是我们将要使用的 Dockerfile,其中每一行都包含注释来解释正在发生的事情:
创建 docker-compose.yml
docker-compose.yml文件定义和管理多容器 Docker 应用程序。它指定如何配置和运行多个容器(特别是针对我们的应用程序和数据库)以及它们之间的交互。此文件使您可以轻松地通过单个命令启动所有必要的服务,从而简化开发或生产环境的设置。
| version: "3.9" | |
| services: | |
| app: | |
| container_name: app | |
| build: | |
| context: . | |
| dockerfile: Dockerfile | |
| depends_on: | |
| - db | |
| environment: | |
| - DATABASE_URL=postgresql://admin:admin@db:5432/data | |
| volumes: | |
| - .:/app | |
| db: | |
| container_name: db | |
| image: postgres:latest | |
| environment: | |
| POSTGRES_USER: admin | |
| POSTGRES_PASSWORD: admin | |
| POSTGRES_DB: data | |
| ports: | |
| - "5432:5432" | |
| volumes: | |
| - db_data:/var/lib/postgresql/data | |
| restart: always | |
| volumes: | |
| db_data: |
测试我们的 Docker 构建
为了确认一切按预期工作,让我们 使用以下代码在根目录中创建一个main.py文件。
| from sqlalchemy import create_engine | |
| from utils.load_env import * | |
| import time | |
| from data_access.models.base import Base | |
| print("Hello world") | |
| engine = create_engine(db_url, echo=True) | |
| Base.metadata.create_all(engine) |
配置 PGAdmin(可选)
PGAdmin 是一款出色的数据库探索工具,无需编写任何代码。要开始使用,只需将 PGAdmin 下载到您的计算机,然后输入以下详细信息注册一个新服务器:
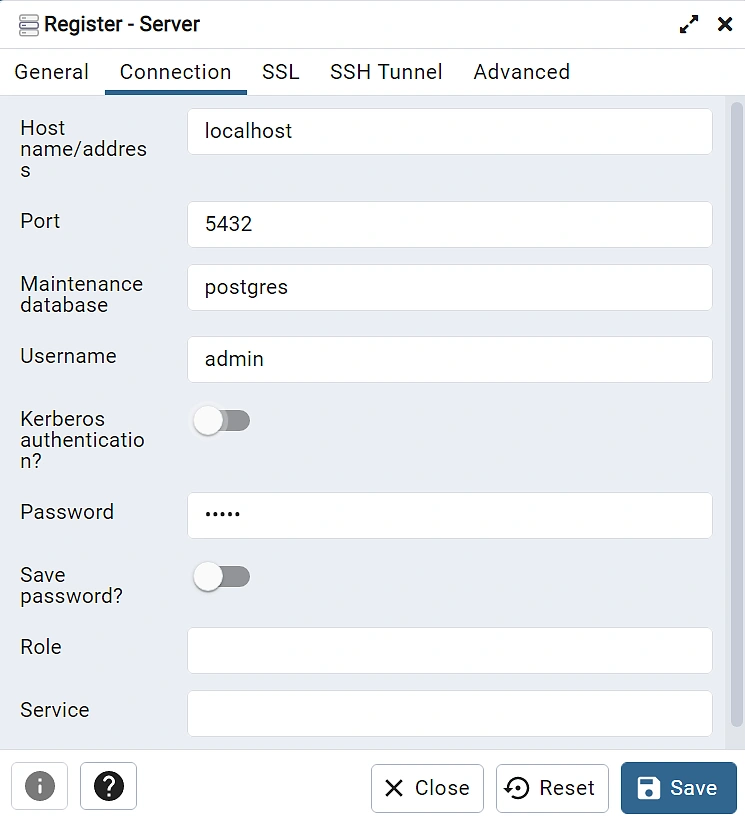
密码也是admin。这些也在 db 容器下的 docker-compose.yml 中定义。
现在,如果您展开服务器,导航到数据 数据库,并展开 表 对象,您将看到我们的应用程序的表已成功安装。

您可以使用 SQL 直接查询数据,或者右键单击表并选择查看所有行以查看所有可用的行。
步骤 6.创建服务
现在让我们创建交易机器人将用于执行各种任务的服务类。让我们从CoinGecko服务开始——该类包含几种从 CoinGecko API 获取数据的方法。
构建 CoinGecko(API)服务
在services目录中,创建一个名为coingecko_service.py的新文件。在此文件中,我们将定义一个 CoinGecko 类,其构造函数中包含两个变量:self.headers和self.root。这种方法可确保我们的代码保持 DRY(不要重复),避免不必要地重复端点的根 URL。
CoinGecko 类需要执行以下操作:
-
使用 coin_id 获取特定硬币的价格。
-
检索可用的基准硬币对(在 CoinGecko API 中也称为/simple/supported_vs_currencies )。
-
获取硬币数据列表。
我们的实现应该是这样的:
| import requests | |
| from data_access.models.coin import Coin, CoinPrice | |
| from utils.load_env import * | |
| from typing import List | |
| from datetime import datetime | |
| class CoinGecko: | |
| def __init__(self): | |
| self.root = "https://api.coingecko.com/api/v3" | |
| self.headers = { | |
| "accept": "application/json", | |
| "x-cg-demo-api-key": f"{cg_api_key}", | |
| } | |
| def get_price_by_coin_id(self, coin_id: str): | |
| request_url = self.root + f"/simple/price?ids={coin_id}&vs_currencies=usd" | |
| response = requests.get(request_url, self.headers).json() | |
| print(response) | |
| return response[coin_id]["usd"] | |
| def get_vs_currencies(self): | |
| request_url = self.root + "/simple/supported_vs_currencies" | |
| return requests.get(request_url, self.headers).json() | |
| def get_coin_list(self) -> List[Coin]: | |
| request_url = ( | |
| self.root | |
| + "/coins/markets?order=market_cap_desc&per_page=250&vs_currency=usd&price_change_percentage=1h" | |
| ) | |
| response = requests.get(request_url, headers=self.headers).json() | |
| coins = [] | |
| for coin_data in response: | |
| coin = Coin( | |
| coin_id=coin_data["id"], | |
| symbol=coin_data["symbol"], | |
| realized_pnl=None, | |
| ) | |
| price = CoinPrice( | |
| symbol=coin_data["symbol"], | |
| timestamp=datetime.now(), | |
| value=coin_data["current_price"], | |
| ) | |
| coin.prices = [price] | |
| coin.price_change = coin_data["price_change_percentage_1h_in_currency"] | |
| coins.append(coin) | |
| return coins |
为了实现这一点,我们将以下参数传递给端点:
f"/coins/markets?order=market_cap_desc&per_page=250&vs_currency={Currency.USD}&price_change_percentage=1h"
当包含price_change_percentage参数时,每个 Coin 对象都会包含一个附加属性来存储该值。在本例中,该属性名为price_change_percentage_1h_in_currency,因为我们查询的是相对于vs_currency (美元)的价格变化。
要获取所有 vs_currencies,可以使用get_vs_currencies()方法,并将其输出存储在某个位置以便于访问。在此应用程序中,我们将输出存储在Enum中,该 Enum 位于enums目录下名为currencies.py的文件中。

| class Currency(Enum): | |
| BTC = "btc" | |
| ETH = "eth" | |
| LTC = "ltc" | |
| BCH = "bch" | |
| BNB = "bnb" |
构建交易服务
交易服务负责为我们的模拟交易机器人执行模拟买卖操作。这些方法返回一个PaperOrder对象,其中包含我们通常期望从交易订单中获得的关键信息。
此外,我们定义了一个calculate_cost_basis()函数,用于计算特定硬币的累计成本,帮助我们跟踪特定资产的总持有量和平均价值。
首先,在 services 下创建一个名为trading_service.py的新文件。现在,我们来构建buy()、sell()和calculate_cost_basis()方法:
| from datetime import datetime | |
| from data_access.models.paper_order import PaperOrder | |
| class TradingService: | |
| def __init__(self): | |
| pass | |
| @staticmethod | |
| def buy(symbol: str, current_price: float, quantity: float) -> PaperOrder: | |
| return PaperOrder( | |
| timestamp=datetime.now(), | |
| buy_price=current_price, | |
| quantity=quantity, | |
| symbol=symbol, | |
| direction="BUY", | |
| ) | |
| @staticmethod | |
| def sell(symbol: str, current_price: float, quantity: float) -> PaperOrder: | |
| return PaperOrder( | |
| timestamp=datetime.now(), | |
| buy_price=current_price, | |
| quantity=quantity, | |
| symbol=symbol, | |
| direction="SELL", | |
| ) | |
| @staticmethod | |
| def calculate_cost_basis( | |
| current_cost_basis: float, | |
| total_qty: float, | |
| new_order_qty: float, | |
| new_order_price: float, | |
| ) -> float: | |
| new_total_quantity = total_qty + new_order_qty | |
| if new_total_quantity == 0: | |
| return 0 # If all quantities are sold, cost basis resets | |
| return ( | |
| (current_cost_basis * total_qty) + (new_order_price * new_order_qty) | |
| ) / new_total_quantity |
步骤 7. 将逻辑整合在一起
所有必要的组件都准备就绪后,我们就可以构建核心逻辑并定义 Python 应用程序的入口点了。首先在根目录中创建一个名为main.py的文件,并导入所需的依赖项,包括外部库和我们在项目中创建的文件。
| import logging | |
| from typing import List | |
| from sqlalchemy import create_engine | |
| from sqlalchemy.orm import sessionmaker | |
| from data_access.DAL.orders_DAL import OrdersDAL | |
| from data_access.DAL.portfolio_DAL import PortfolioDAL | |
| from data_access.DAL.coins_DAL import CoinsDAL | |
| from data_access.models.coin import Coin | |
| from services.coingecko_service import CoinGecko | |
| from services.trading_service import TradingService | |
| from utils.load_env import * | |
| from datetime import datetime | |
| import time | |
| from data_access.models.base import Base |
请注意这一行'Base.metadata.create_all(engine)'– 这一行初始化我们的数据库表,因为我们已经在模型目录下定义了它们。
| logging.disable(logging.CRITICAL) | |
| print("Waiting For Database to mount...") | |
| time.sleep(5) | |
| # Create engine and session using the database URL from environment | |
| engine = create_engine(db_url, echo=True) | |
| Base.metadata.create_all(engine) | |
| Session = sessionmaker(bind=engine) | |
| session = Session() |
现在,让我们实例化我们的服务:
| # Initialize DALs and Services | |
| coins_dal = CoinsDAL(session) | |
| orders_dal = OrdersDAL(session) | |
| portfolio_dal = PortfolioDAL(session) | |
| cg = CoinGecko() |
| def initialize_coin_data(): | |
| if len(coins_dal.get_all_coins()) > 0: | |
| print("DB already initialized, skipping...") | |
| return | |
| cg = CoinGecko() | |
| all_coins = cg.get_coin_list() | |
| # Add coins and their initial prices to the list | |
| for coin in all_coins: | |
| coins_dal.add_coin(coin.symbol, coin.coin_id) | |
| coins_dal.add_price_to_coin( | |
| coin.symbol, coin.prices[0].timestamp, coin.prices[0].value | |
| ) | |
| print(f"Added {len(all_coins)} coins.") | |
| print(f"Added Prices to {len(all_coins)} coins.") |
| def update_coin_prices() -> List[Coin]: | |
| db_coins = coins_dal.get_all_coins() | |
| db_coins_ids = [coin.coin_id for coin in db_coins] | |
| if len(db_coins) == 0: | |
| print("There are no coins in the database, cannot add prices") | |
| return | |
| coin_list = cg.get_coin_list() | |
| new_coins = 0 | |
| for coin in coin_list: | |
| if coin.coin_id not in db_coins_ids: | |
| new_coins += 1 | |
| coins_dal.add_coin(coin.symbol, coin.coin_id) | |
| coins_dal.add_price_to_coin(coin.symbol, datetime.now(), coin.prices[0].value) | |
| print(f"Price updated for {len(db_coins)} coins") | |
| print( | |
| f"Inserted {new_coins} coins to the coins table likely due movements in the top 250." | |
| ) | |
| return coin_list |
| def handle_buy(coin, current_price): | |
| if coin.price_change < price_change: | |
| return | |
| order = TradingService.buy(coin.symbol, current_price, qty) | |
| existing_portfolio = portfolio_dal.get_portfolio_item_by_symbol(order.symbol) | |
| if existing_portfolio is None: | |
| portfolio_dal.insert_portfolio_item( | |
| order.symbol, order.buy_price, order.quantity | |
| ) | |
| print( | |
| f"Bought {order.symbol} and inserted new portfolio item for {order.symbol}" | |
| ) | |
| else: | |
| cost_basis = TradingService.calculate_cost_basis( | |
| existing_portfolio.cost_basis, | |
| existing_portfolio.total_quantity, | |
| order.quantity, | |
| order.buy_price, | |
| ) | |
| portfolio_dal.update_portfolio_item_by_symbol( | |
| order.symbol, cost_basis, order.quantity | |
| ) | |
| print( | |
| f"Bought {order.symbol}. We already hold {order.symbol}, updating existing portfolio with new order data." | |
| ) | |
| orders_dal.insert_order( | |
| order.timestamp, order.buy_price, order.quantity, order.symbol, order.direction | |
| ) |
| def handle_sell(coin, current_price): | |
| buy_orders = orders_dal.get_all_orders("BUY") | |
| filtered_buy_orders = [order for order in buy_orders if order.symbol == coin.symbol] | |
| if not filtered_buy_orders: | |
| return | |
| for order in filtered_buy_orders: | |
| stop_loss_price = order.buy_price * (1 - sl / 100) | |
| take_profit_price = order.buy_price * (1 + tp / 100) | |
| current_pnl = (current_price - order.buy_price) / order.buy_price * 100 | |
| if current_price <= stop_loss_price: | |
| sell_order = TradingService.sell( | |
| order.symbol, current_price, order.quantity | |
| ) | |
| print( | |
| f"Stop Loss Triggered: Sold {order.quantity} of {order.symbol} at ${current_price}" | |
| ) | |
| elif current_price >= take_profit_price: | |
| sell_order = TradingService.sell( | |
| order.symbol, current_price, order.quantity | |
| ) | |
| print( | |
| f"Take Profit Triggered: Sold {order.quantity} of {order.symbol} at ${current_price}" | |
| ) | |
| else: | |
| continue | |
| orders_dal.insert_order( | |
| sell_order.timestamp, | |
| sell_order.buy_price, | |
| sell_order.quantity, | |
| sell_order.symbol, | |
| sell_order.direction, | |
| ) | |
| coins_dal.update_coin_pnl(order.symbol, current_pnl) |
if current_price <= stop_loss_price:和,elif current_price >= take_profit_price: 基本上表示如果达到止损或止盈,我们就想平仓。
现在我们已经构建了定义交易机器人逻辑的所有方法,我们需要循环运行这些方法,以便我们的机器人可以连续运行。
由于我们要求 CoinGecko API 每 1 小时更改一次价格,因此我们的交易机器人每小时运行一次并执行以下任务是合理的:
| def main(): | |
| # Populate database with initial data | |
| initialize_coin_data() | |
| while True: | |
| api_coins = update_coin_prices() | |
| for coin in api_coins: | |
| current_price = coin.prices[0].value | |
| handle_buy(coin, current_price) | |
| handle_sell(coin, current_price) | |
| portfolio_dal.add_pnl_entry_by_symbol( | |
| coin.symbol, datetime.now(), coin.prices[0].value | |
| ) | |
| print("Engine cycle complete, sleeping for 1 hour.") | |
| time.sleep(3600) | |
| if __name__ == "__main__": | |
| main() |
main ()函数按照以下流程汇集了我们所有的逻辑:
-
我们用初始数据填充数据库,并从 CoinGecko 中提取排名前 250 的代币
-
然后,我们处理每个硬币的买卖场景并添加新的价格条目。
-
最后,我们的算法睡眠 1 小时,然后重复该循环
要启动您的机器人,只需docker compose -p "paper_bot" up -d --build 从根目录运行:。
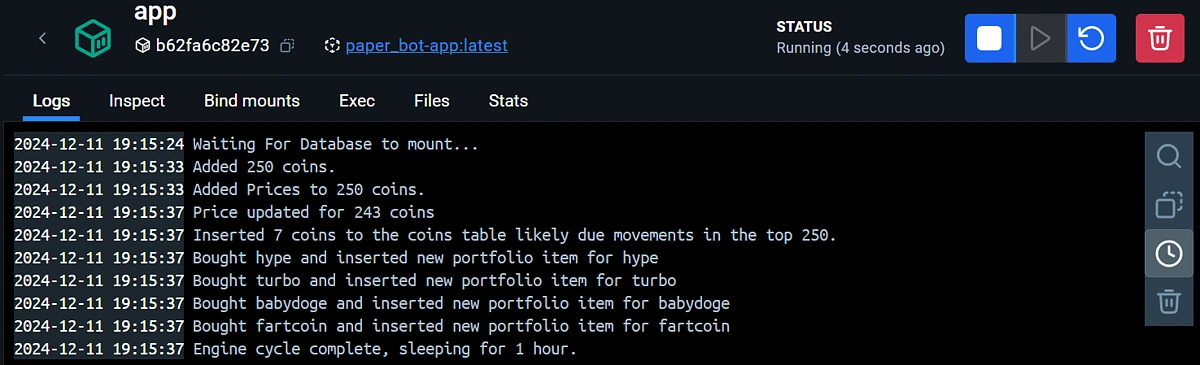
要查看应用程序日志,请docker logs app从命令行运行。您也可以使用 Docker Desktop 并点击进入应用程序容器,然后应该会看到以下日志:
如需查看数据库,您可以使用 PGAdmin 应用(如果已安装)并从中查询。或者,安装 psql CLI 并使用以下命令连接到数据库:
psql -h localhost -p 5432 -U admin -d data
恭喜!现在,您拥有一个完全 Docker 化的纸质交易机器人,它可以扫描市值排名前 250 的代币,以识别波动性资产。
结论与思考
该机器人专为模拟交易而设计,这意味着不涉及任何实际的财务风险。然而,由于它进行的是模拟交易,因此无法参与实时订单簿。这意味着由于滑点或部分成交等因素,结果可能与实时交易有所不同。
要进行实时交易,机器人需要连接到交易所。如果您决定这样做,请确保您以负责任的方式进行交易,并考虑实施额外的错误处理机制,以应对实时市场状况的复杂性。