作为加密货币交易者,我们花费大量时间分析价格图表、研究趋势并解读市场指标以发现投资机会。人工智能和机器学习可以让这个过程更快、更高效。
在本指南中,我们将使用来自CoinGecko API的历史市场数据构建一个简单的加密货币价格预测模型。在完全透明和可控的前提下,交易者可以微调模型以适应自己的策略,甚至可以 使用加密货币机器人进行自动交易。

先决条件
开发环境
确保你的机器上安装了 Node.js 和 npm。Node.js 是基于 Chrome V8 JavaScript 引擎构建的 JavaScript 运行时,npm 是 Node.js 的包管理器,用于管理项目的依赖项。你可以从 Node.js 官方网站下载并安装这两个软件包。
加密货币价格和市场数据
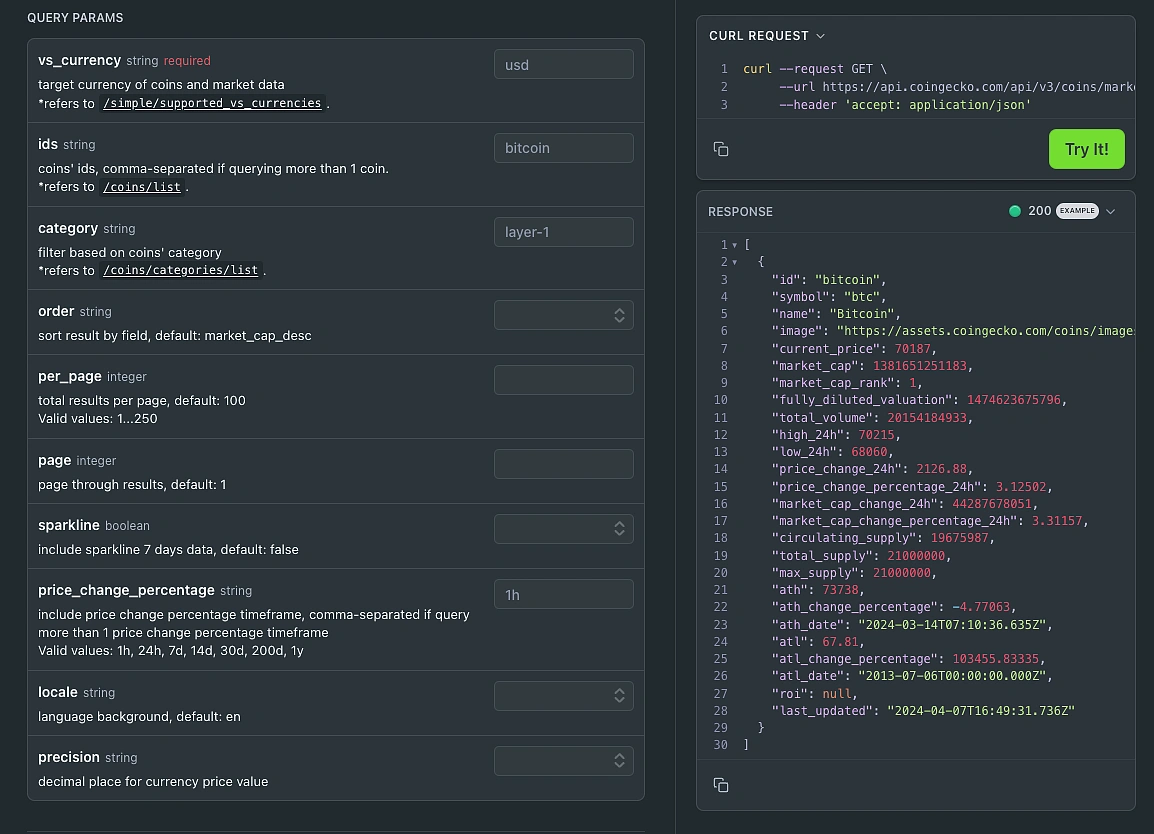
我们将使用CoinGecko API 获取加密货币价格和市场数据,特别是/market_chart端点。免费的演示计划足以满足我们的需求,其速率限制为每分钟 30 次调用,每月上限为 10,000 次调用。立即创建一个模拟账户 来试用。

Python 3 和 Pip
需要安装这些才能开始为您的 DeFi 应用程序开发和运行 AI 模型。
确保你的系统上安装了 Python 3 和 pip。Python 用于 AI 模型开发,而 pip 可以帮助你安装所需的 Python 库。你可以在终端中运行 python --version和来检查 Python 和 pip 是否已安装。pip --version
建议创建一个虚拟环境来隔离项目的依赖项。这可以防止不同项目所需的包之间发生冲突。
导航到项目目录并执行 来创建虚拟环境 python -m venv venv。venv\Scripts\activate在 Windows 上,使用 激活它;在 macOS/Linux 上,使用 source激活它 venv/bin/activate 。现在,您的终端应该会显示该环境已激活。
Python 库
接下来,运行以下命令安装必要的 Python 库:
pip install numpy pandas scikit-learn requests此命令安装以下软件包:
NumPy:一个支持大型多维数组和矩阵的数值计算库。
Pandas:一个提供数据结构和数据分析工具的库。
scikit-learn:一个机器学习库,具有分类、回归、聚类等各种算法。
请求:一个用于发出 API 请求的简单 HTTP 库,用于从 CoinGecko API 等 API 中获取数据。
Node.js 模块
对于应用程序的服务器端开发,您需要安装特定的Node.js模块。假设您已安装 Node.js 和 npm,则可以使用 npm 安装这些模块。在终端中运行:
npm install express axiosExpress是一个 Node.js 的 Web 框架,可简化服务器创建,而axios是一个基于承诺的 HTTP 客户端,用于发出 API 请求。
npm install express axios python-shell dotenv初始化 Node.js 项目
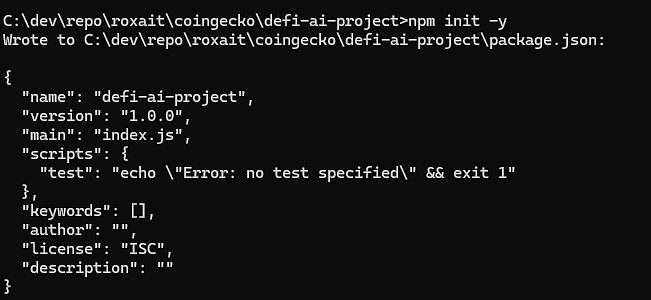
在您的项目目录中,使用npm初始化一个新的 Node.js 项目,它将创建一个package.json文件来管理项目元数据和依赖项。
npm init -ypackage.json使用默认值创建文件:
test_env.py) 来测试您的设置,该脚本会导入这些库并打印一条确认消息。使用 python 运行该脚本test_env.py;如果没有出现错误,则表示您的 Python 环境已正确设置。
为你的DeFAI项目创建一个专用目录,以保持项目井然有序。你可以在终端中运行以下命令来执行此操作:
mkdir defi-ai-project
cd defi-ai-project
您的项目目录现在应如下所示:
DeFi-AI 项目/
│ │ ai_model.py
│ │ 数据收集器.py
│ ...
│ │ 包.json
└── node_modules/
步骤1.收集市场数据
我们将使用历史价格数据训练我们的 AI 模型,以提供对市场趋势和模式的洞察。在本例中,我们将使用 CoinGecko API 中比特币 30 天的价格历史记录来预测其价格。拥有干净、高质量的数据至关重要,因为它会影响模型的性能。使用近期数据也有助于确保模型反映当前的市场行为。
在您的项目目录中,创建一个名为 data_collector.py 的文件:
import requests
import pandas as pd
import os
# Load environment variables
COINGECKO_API_KEY = "CG_API_KEY"
def fetch_market_data():
    url = 'https://pro-api.coingecko.com/api/v3/coins/bitcoin/market_chart'
    params = {
        'vs_currency': 'usd',
        'days': '30',  # Last 30 days
        'x_cg_pro_api_key': COINGECKO_API_KEY,
    }
    try:
        # Fetch data from CoinGecko API
        print("Fetching market data from CoinGecko...")
        response = requests.get(url, params=params)
        response.raise_for_status()
        data = response.json()
        # Parse price and volume data
        prices = data.get('prices', [])
        volumes = data.get('total_volumes', [])
        print(f"Data points received: {len(prices)}")
        # Create DataFrame
        df_prices = pd.DataFrame(prices, columns=['timestamp', 'price'])
        df_volumes = pd.DataFrame(volumes, columns=['timestamp', 'volume'])
        # Merge prices and volumes on timestamp
        df = pd.merge(df_prices, df_volumes, on='timestamp')
        # Convert timestamp to datetime
        df['timestamp'] = pd.to_datetime(df['timestamp'], unit='ms')
        # Sort data by timestamp
        df = df.sort_values('timestamp')
        # Save to CSV
        df.to_csv('market_data.csv', index=False)
        print("Market data collected and saved to market_data.csv")
    except requests.exceptions.HTTPError as http_err:
        print(f"HTTP error occurred: {http_err}")
    except Exception as err:
        print(f"An error occurred: {err}")
if __name__ == '__main__':
    fetch_market_data()
守则解释
API 端点:使用 CoinGecko API 获取历史市场数据。
参数:
coin_id:加密货币标识符(例如“比特币”)。
vs_currency:用于比较的法定货币(例如“美元”)。
days:要检索数据的天数。
检索到的数据:
价格:不同时间戳的历史价格。
交易量:不同时间戳的交易量。
数据处理:
合并价格和数量数据。
将时间戳转换为人类可读的日期时间。
按时间顺序对数据进行排序。
错误处理:
捕获 HTTP 错误和一般异常。
输出:将处理后的数据保存到market_data.csv。
执行以下命令收集市场数据:
python data_collector.py预期输出:

market_data.csv文件

注意:数据点的数量可能因 API 的数据粒度而异。
第 2 步:构建 AI 模型
利用收集到的数据,我们将构建一个 AI 模型来预测未来的比特币价格。在你的项目目录中,创建一个名为的文件ai_model.py并复制以下代码
import pandas as pd
from sklearn.linear_model import LinearRegression
import sys
import json
import warning
warnings.filterwarnings("ignore")
# Load historical market data
data = pd.read_csv('market_data.csv')
# Feature Engineering: Use previous price as a feature
data['prev_price'] = data['price'].shift(1)
data = data.dropna()
# Prepare the data
X = data[['prev_price']]
y = data['price']
# Train the model
model = LinearRegression()
model.fit(X, y)
# Make a prediction
# Accept the latest price as a command-line argument
if len(sys.argv) > 1:
latest_price = float(sys.argv[1])
else:
latest_price = X.iloc[-1]['prev_price'] # Use the last known price
prediction = model.predict([[latest_price]])
# Output the prediction in JSON format
print(json.dumps({'prediction': prediction[0]}))
守则解释
数据加载:读取market_data.csv文件。
预处理:
特征工程:根据之前的价格和数量创建特征。
处理缺失值:删除因移位操作而产生 NaN 值的行。
模型训练:
使用 scikit-learn 的 LinearRegression。
预言:
接受最新价格和数量作为输入。
预测未来价格。
命令行参数:
latest_price:最新已知价格(从 Node.js 脚本传递)。
latest_volume:最新已知卷(从 Node.js 脚本传递)。
输出:以 JSON 格式打印预测。

步骤 3.设置 Node.js 服务器
我们将设置一个 Express 服务器来处理 API 请求并集成 AI 模型。在您的项目目录中,创建一个名为的文件index.js:
const express = require('express');
const axios = require('axios');
const { execFile } = require('child_process');
const path = require('path');
const app = express();
app.use(express.json());
function getAIPrediction(latestPrice) {
return new Promise((resolve, reject) => {
execFile('python', ['ai_model.py', latestPrice], { cwd: __dirname }, (error, stdout, stderr) => {
if (error) {
console.error('Error executing Python script:', error);
reject(error);
} else if (stderr) {
console.error('Python script error output:', stderr);
reject(stderr);
} else {
try {
console.log('Python script output:', stdout);
const result = JSON.parse(stdout);
resolve(result.prediction);
} catch (error) {
console.error('Error parsing Python script output:', error);
reject(error);
}
}
});
});
}
// API Endpoint to Predict Price
app.get('/predict_price', async (req, res) => {
try {
// Fetch latest price
const response = await axios.get('https://api.coingecko.com/api/v3/simple/price', {
params: {
ids: 'bitcoin',
vs_currencies: 'usd',
},
});
const latestPrice = response.data.bitcoin.usd;
// Get AI prediction
const predictedPrice = await getAIPrediction(latestPrice);
res.json({
latest_price: {
value: latestPrice,
currency: 'USD',
},
predicted_price: {
value: predictedPrice,
currency: 'USD',
},
});
} catch (error) {
console.error('Error predicting price:', error);
res.status(500).json({ error: error.message });
}
});
// Start server
const PORT = process.env.PORT || 3000;
app.listen(PORT, () => {
console.log(`Server is running on port ${PORT}`);
});
// Initial Actions
(async () => {
try {
// Fetch latest price
const response = await axios.get('https://api.coingecko.com/api/v3/simple/price', {
params: {
ids: 'bitcoin',
vs_currencies: 'usd',
},
});
const latestPrice = response.data.bitcoin.usd;
console.log(`Latest Bitcoin Price: $${latestPrice}`);
// Get AI prediction
const predictedPrice = await getAIPrediction(latestPrice);
console.log(`AI Predicted Price: $${predictedPrice.toFixed(2)} USD`);
// Simple trading strategy
if (predictedPrice > latestPrice * 1.01) {
console.log('Prediction suggests price will increase. Consider buying.');
} else if (predictedPrice < latestPrice * 0.99) {
console.log('Prediction suggests price will decrease. Consider selling.');
} else {
console.log('Prediction suggests price will remain stable. Hold position.');
}
} catch (error) {
console.error('Error during AI processing:', error);
}
})();
守则解释
数据获取:
检索比特币的最新价格和交易量。
使用 axios 对 CoinGecko 进行并发 API 调用。
AI预测集成:
使用 child_process.execFile 运行 Python 脚本。
将 latestPrice 和 latestVolume 作为参数传递。
解析 Python 脚本的 JSON 输出。
API 端点:
/predict_price:返回最新价格、交易量和AI预测价格。
初步行动:
启动服务器时获取数据。
将预测和交易建议打印到控制台。
错误处理:
记录错误并返回适当的 HTTP 响应。
重要提示:如果您安装了多个 Python 版本,请在 execFile 中使用“python3”而不是“python”。在 Windows 上,您可能需要指定 Python 可执行文件的完整路径。
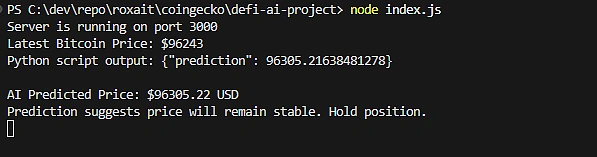
步骤 4:运行应用程序
确保安装了所有 Node.js 依赖项和所需模块:
npm install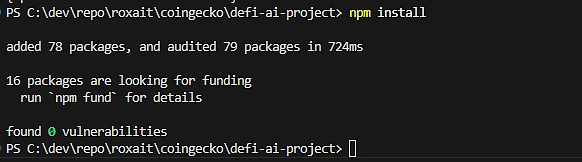
启动服务器
node index.js预期输出:
步骤 5. 测试 AI 预测端点
使用 cURL
curl http://localhost:3000/predict_price预期输出
{
  "latest_price": {
    "value": XXXXX,
    "currency": "USD"
  },
  "predicted_price": {
    "value": XXXXX,
    "currency": "USD"
  }
}
注意:实际值将根据当前市场数据而有所不同。
结论
如果您一直在关注本文,那么您已经使用历史市场数据构建了一个简单的 AI 加密货币价格预测模型,并将其集成到 Web 服务器中。在此基础上,您可以进一步完善该模型,使用高级 AI 模型进行训练,扩展对多种加密货币的支持,并优化界面以提供更佳的用户体验。